Using the plugin interface
The PlentyONE plugin interface is a collection of interfaces. It represents all the modules and sub-modules available in PlentyONE . These modules contain all methods necessary for your plugin to communicate with PlentyONE .
This page covers the following steps:
-
Integrating the plugin interface into an IDE
-
Modifying the TopItems plugin to display top items
Integrating the interface into your IDE
You can integrate the interface into your IDE. Integrating the interface allows you to use your IDE’s auto-complete feature when developing plugins. Regardless of which IDE you use, start by carrying out the following steps:
-
Clone the plugin interface repository.
-
Switch to the branch that corresponds to your system version.
|
System version
PlentyONE systems run on one of the following versions:
By default, test systems use the stable version. To check or change your system version, proceed as follows:
Note that the system versions stable and beta correspond to the branches stable7 and beta7 respectively in the plugin interface repository. |
For the next step, you need PhpStorm.
-
Open PhpStorm.
-
Open the TopItemsPlugin project.
-
In the project tree area, click on External Libraries.
A new window opens. -
As Development environment, select PHP language level 7.
-
In the Include path area, click on Add.
-
Select the PlentyONE plugin interface folder.
-
Click on OK.
The plugin interface is added as an external library. -
Click on Apply.
-
Click on OK.
The plugin interface is now a source.
You can now use the auto-complete feature of your IDE when developing plugins.
Filtering top items
It’s time to modify your base plugin, so that it displays your top items in your shop. You can set an item as top item when editing the item. Test systems come with some pre-configured top items by default. This means your plugin can display these items without any additional setup. This way, you can edit your plugin and see the results straight away.
First, you need to filter your items for top items.
-
Open
src/Controllers/TopItemController. -
Add the following code snippet.
<?php

namespace TopItems\Controllers;

use Plenty\Plugin\Controller;
use Plenty\Plugin\Templates\Twig;
use Plenty\Modules\Item\DataLayer\Contracts\ItemDataLayerRepositoryContract; (1)

class TopItemsController extends Controller
{
    public function showTopItems(Twig $twig, ItemDataLayerRepositoryContract $itemRepository):string
    {
        $itemColumns = [ (2)
            'itemDescription' => [
                'name1',
                'description'
            ],
            'variationBase' => [
                'id'
            ],
            'variationRetailPrice' => [
                'price'
            ],
            'variationImageList' => [
                'path',
                'cleanImageName'
            ]
        ];

        $itemFilter = [ (3)
            'itemBase.isStoreSpecial' => [
                'shopAction' => [3] (4)
            ]
        ];

        $itemParams = [ (3)
            'language' => 'en'
        ];

        $resultItems = $itemRepository
            ->search($itemColumns, $itemFilter, $itemParams); (5)

        $items = array(); (6)
        foreach ($resultItems as $item)
        {
            $items[] = $item;
        }
        $templateData = array(
            'resultCount' => $resultItems->count(),
            'currentItems' => $items
        );

        return $twig->render('TopItems::content.TopItems', $templateData); (7)
    }
}| 1 | Extends ItemDataLayerRepositoryContract to access its search method. |
| 2 | Defines which database columns to include in the search. |
| 3 | Defines which values to search for. |
| 4 | Represents the top items option at the item level. |
| 5 | Searches for all top items. |
| 6 | Saves the search results in an array. |
| 7 | Renders the seach results in the TopItems template. |
With this, you’ve filtered all the items in your system for the top items. Next, you have to display them.
Displaying top items
PlentyONE shops use TWIG templates to display content.
Your plugin currently contains one template, Index.twig.
This is the template you accessed when going to the /hello-world route in your shop.
To display your top items, create two additional templates.
One template provides the general design of the page, the other injects the item data.
Start by creating the necessary files:
-
In the
resources/viewsfolder, createPageDesign.twig. -
In the
resources/viewsfolder, create a newcontentfolder. -
In the
resources/views/contentfolder, createTopItems.twig.
Open PageDesign.twig and add the following code snippet:
<!DOCTYPE html>
<html lang="en">
    <head>
        <title>Top items</title>

        <!-- CSS -->
        <link rel="stylesheet" href="https://stackpath.bootstrapcdn.com/bootstrap/4.4.1/css/bootstrap.min.css" integrity="sha384-Vkoo8x4CGsO3+Hhxv8T/Q5PaXtkKtu6ug5TOeNV6gBiFeWPGFN9MuhOf23Q9Ifjh" crossorigin="anonymous" type="text/css"> (1)

    </head>
    <body>
        <div id="page-body">
            {% block PageBody %}
                (2)
            {% endblock %}
        </div>
    </body>
</html>| 1 | Inserts a bootstrap style sheet. This matches the styles used in the default plentyShop. |
| 2 | Provides space for injecting content from other templates. |
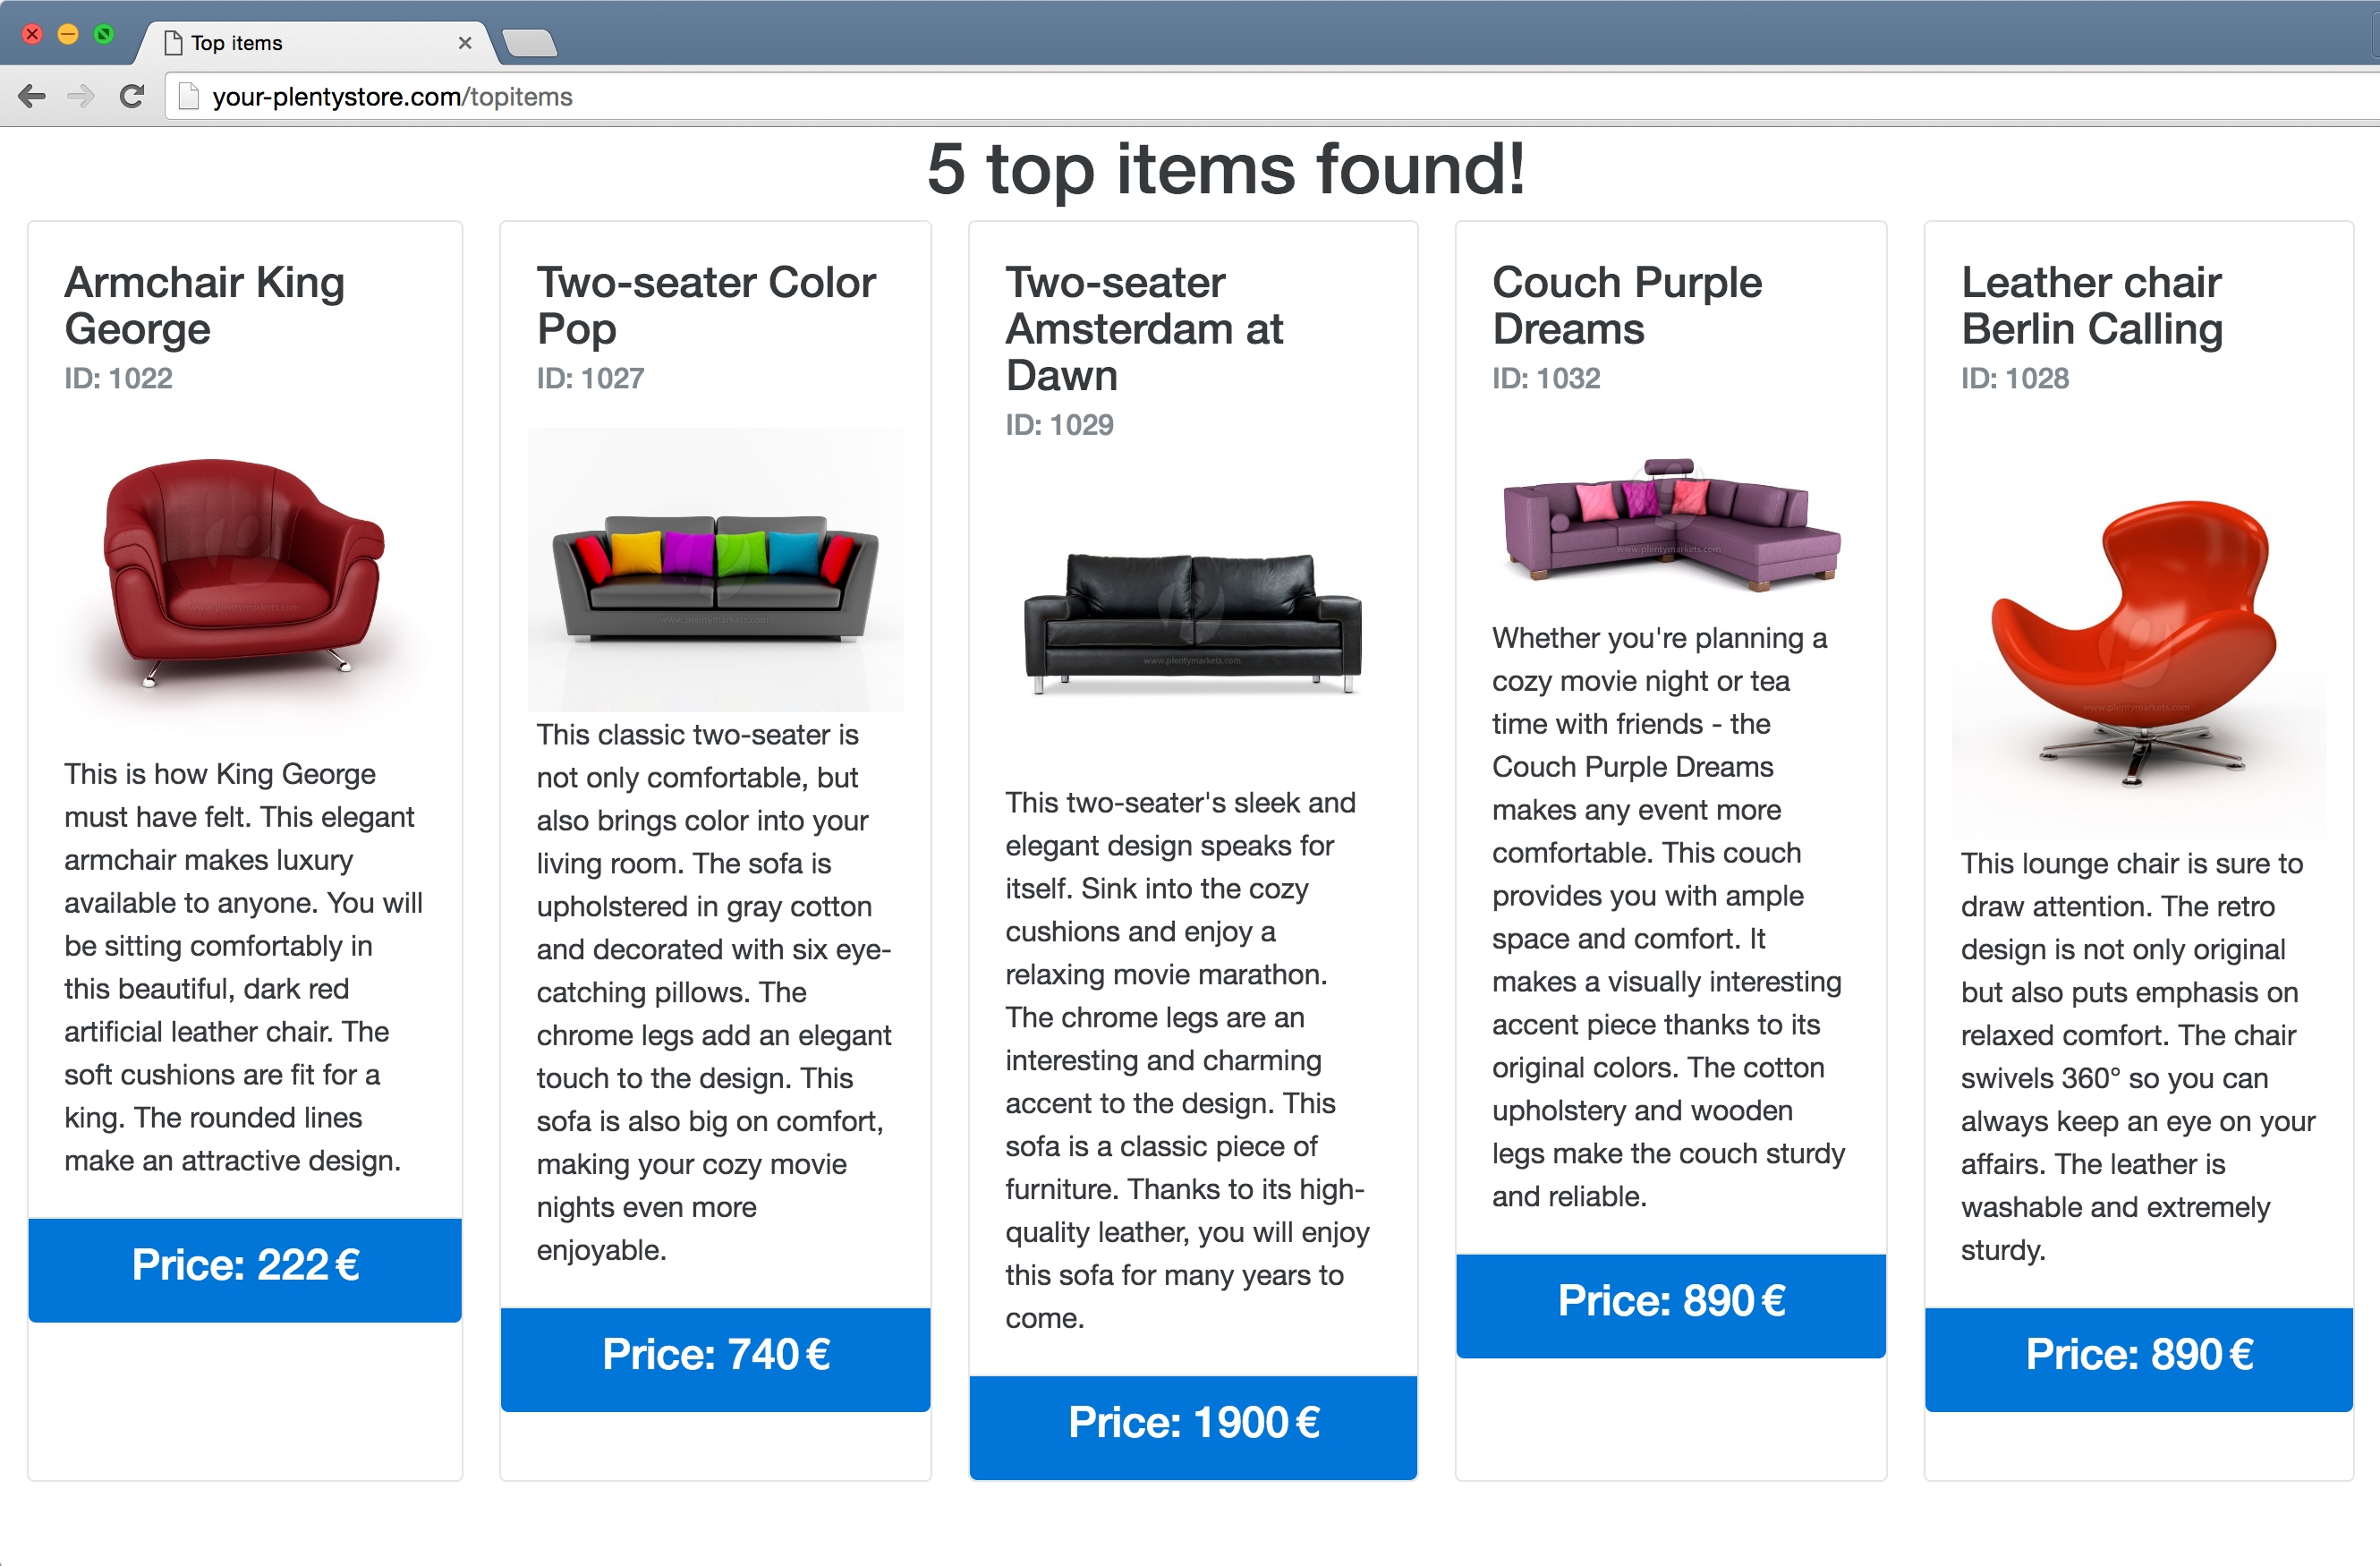
Next, open TopItems.twig and add the following code snippet:
{% extends "TopItems::PageDesign" %} (1)

{% block PageBody %} (2)
    <h1 style="text-align: center">{{ resultCount }} top items found!</h1>
    <div class="col-xs-12 card-deck-wrapper" style="overflow: auto">
    <ul class="list-unstyled card-deck" style="height: 380px">
        {% if currentItems is not null %} (3)
            {% for item in currentItems %} (4)
                <li class="card" style="width: 280px">
                    <div class="card-block">
                        <h4 class="card-title">{{ item.itemDescription.name1 }}</h4>
                        <h6 class="card-subtitle text-muted">ID: {{ item.variationBase.id }}</h6>
                    </div>
                    {% set image = item.variationImageList | first %}
                    <img class="col-lg-12" src="{{ image.path }}" alt="{{ image.cleanImageName }}">
                    <div class="card-block">
                        <p class="card-text">{{ item.itemDescription.description }}</p>
                    </div>
                    <div class="card-footer bg-primary">
                        <h4 style="text-align: center">Price: {{ item.variationRetailPrice.price }} €</h4>
                    </div>
                </li>
            {% endfor %}

            {% else %} (3)
                <li>No items found!</li>
        {% endif %}
    </ul>
    </div>
{% endblock %}| 1 | Specifies the template to use as basis. |
| 2 | Specifies where in the base template to inject the content. |
| 3 | Displays any top items found or a message if there aren’t any. |
| 4 | Renders each item as a card. Each card contains the specified data, as long as the data is set on the item. |
Finally, to make the top items view accessible in your shop, you have to add a new route to your RouteServiceProvider.
-
Open
TopItemsRouteServiceProvider.php. -
Add a new router to the
mapfunction.
    public function map(Router $router)
    {
        $router->get('hello-world', 'HelloWorld\Controllers\ContentController@getHelloWorldPage');
        $router->get('topitems', 'TopItems\Controllers\TopItemsController@showTopItems');
    }
Deploying the plugin
It’s time to upload your changes. You can upload the changes with plentyDevTool.
-
Open plentyDevTool.
-
Toggle TopItems active.
plentyDevTool displays the changed files. -
Click on Push.
plentyDevTool uploads the TopItems plugin to your system.
Like before, you now have to deploy your changes:
-
Open your PlentyONE back end.
-
Go to Plugins » Plugin overview.
-
Open the plugin set where you uploaded TopItems.
-
Save the plugin set.
The plugin set is deployed.
Once the deployment process has finished, you can check the results.
For this, open your shop in the browser.
Then, append /topitems to the URL.
Your browser now displays your system’s top items.
If you haven’t configured any top items, it displays a message instead that the plugin couldn’t find any top items.
This completes the tutorial. You can continue by learning more about the basics of plugin development. Alternatively, check out how to implement a specific type of plugin.