Hello World Simple
Hello World Frontend
A Simple Route
This tutorial is aimed at PlentyONE users who are getting started with plugin development. You will only need basic knowledge of creating and editing files in an integrated development environment (IDE) as well as using plentymarkets.
Code is like humor. When you have to explain it, it’s bad.
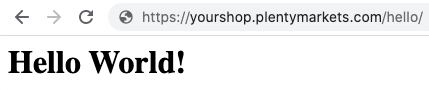
In a few simple steps, we will walk you through creating your first plugin that displays Hello World! in your browser when adding /hello to your domain.
There are often people who like to rush things, and if you are one of them. We totally understand. You can just download the github repository in the master branch and try to figure yourself out what the code means. Otherwise, stay tuned and keep following the next 3 steps!
First File
The first thing that we are going to do is create a plugin.json, which contains all information about our plugin, that we need.
{
      "name":"HelloWorld", (1)
      "description":"My first plugin", (2)
      "namespace":"HelloWorld", (3)
      "author":"PlentyONE GmbH, (4)
      "type":"template", (5)
      "serviceProvider":"HelloWorld\\Providers\\HelloWorldServiceProvider" (6)
}| 1 | This is the name of our plugin. This is also how it will be displayed in the repository. |
| 2 | A description for our plugin |
| 3 | We recommend that you use the name of the plugin folder as the namespace root. This service provider is the central location to register services in the plugin. |
| 4 | The Author of the plugin, your company name or your personal name. |
| 5 | The type of the plugin, for now accept, that this is a template, there are also other type, which we will explain later. |
| 6 | The namespace of our ServiceProvider (We haven’t created it yet) |
Folder Structure
Furthermore we will now present you the structure including all the files, that we will need for our Hello World Plugin.
HelloWorld/ (1)
  resources/
    views/
      content/
        hello.twig (2)
  src/
    Providers/
      HelloWorldRouteServiceProvider.php
      HelloWorldServiceProvider.php
    Controllers/
      ContentController.php
  plugin.json
| 1 | We recommend calling your Folder the same way that you called your Plugin in the plugin.json |
| 2 | You can organize your twig templates in subfolders |
Explanation of all Components
We need a few files to establish the possibility for communication between your plugin and plentymarkets.
-
HelloWorldServiceProvider.phpis our ServiceProvider. It is needed to register the plugin within the PlentyONE backend. -
HelloWorldRouteServiceProvider.phpis our RouteServiceProvider. It creates and registers the output route. -
ContentController.phprenders and displays the content in your template. For us this will be thehello.twig
Our Output
Let’s define what we want to present the user, that comes to our specified route: In out case it’s a simple Hello World.
<h1>Hello World!</h1>Real Coding
So let’s take a look at the Files, that actually do something. We will paste the Source Code and write Explanations to specific code Fragments.
<?php
namespace HelloWorld\Controllers;

use Plenty\Plugin\Controller;
use Plenty\Plugin\Templates\Twig;

/**
 * Class ContentController
 * @package HelloWorld\Controllers
 */
class ContentController extends Controller
{
	/**
	 * @param Twig $twig
	 * @return string
	 */
	public function sayHello(Twig $twig):string (1)
	{
		return $twig->render('HelloWorld::content.hello');
	}
}| 1 | In this code example, we define the sayHello function that renders a twig template. The render method specifies the template location: 'PLUGINNAME::TEMPLATE'. Since templates are always saved in the resources/views folder in your plugin, we only have to specify part of the template path. Note that PLUGINNAME is the name of the plugin folder. The name of the plugin folder and the plugin namespace may differ. |
<?php
namespace HelloWorld\Providers;

use Plenty\Plugin\RouteServiceProvider;
use Plenty\Plugin\Routing\Router;

/**
 * Class HelloWorldRouteServiceProvider
 * @package HelloWorld\Providers
 */
class HelloWorldRouteServiceProvider extends RouteServiceProvider
{
	/**
	 * @param Router $router
	 */
	public function map(Router $router)
	{
		$router->get('hello', 'HelloWorld\Controllers\ContentController@sayHello'); (1)
	}

}| 1 | We use the get method to pass two parameters. The first parameter 'hello' defines the route. The second parameter consists of the Fully-Qualified Class Name and the @ controller method that is called when the route is called. |
<?php
namespace HelloWorld\Providers;

use Plenty\Plugin\ServiceProvider;

/**
 * Class HelloWorldServiceProvider
 * @package HelloWorld\Providers
 */
class HelloWorldServiceProvider extends ServiceProvider
{

	/**
	 * Register the service provider.
	 */
	public function register()
	{
		$this->getApplication()->register(HelloWorldRouteServiceProvider::class); (1)
	}
}| 1 | This line registers the HelloWorldRouteServiceProvider with our application. This means the RouteServiceProvider will map our route to your plentyshop. Therefore the circle is complete. Coding is done 😎. Commit your repository to your github repo. |
Integrate your Plugin into your Shop
After pushing the code to your github repository, you need the full Github URL and your login Credentials.
-
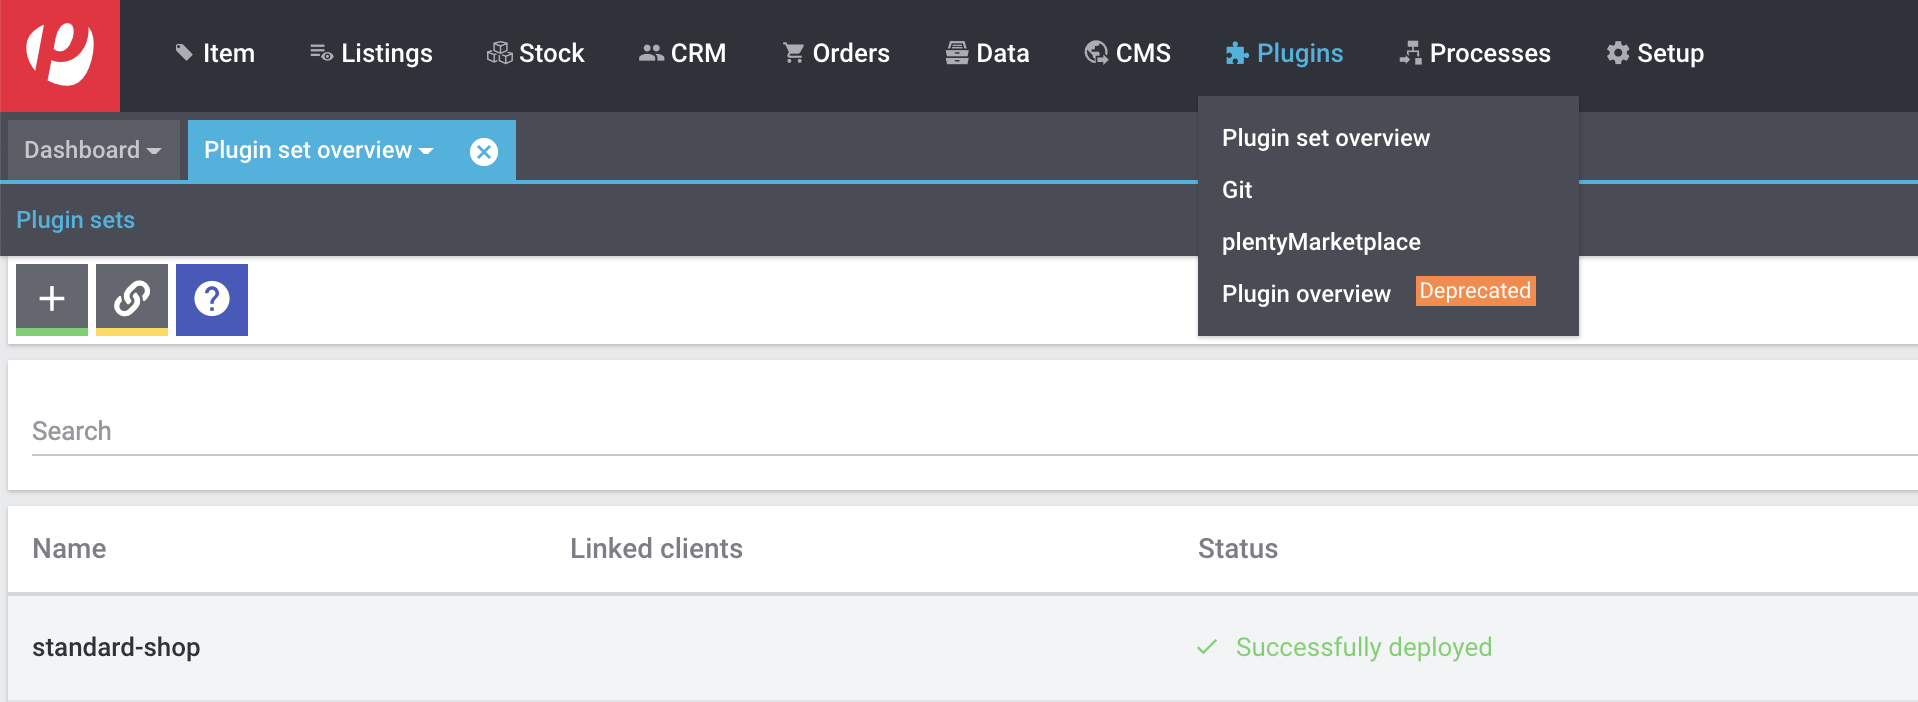
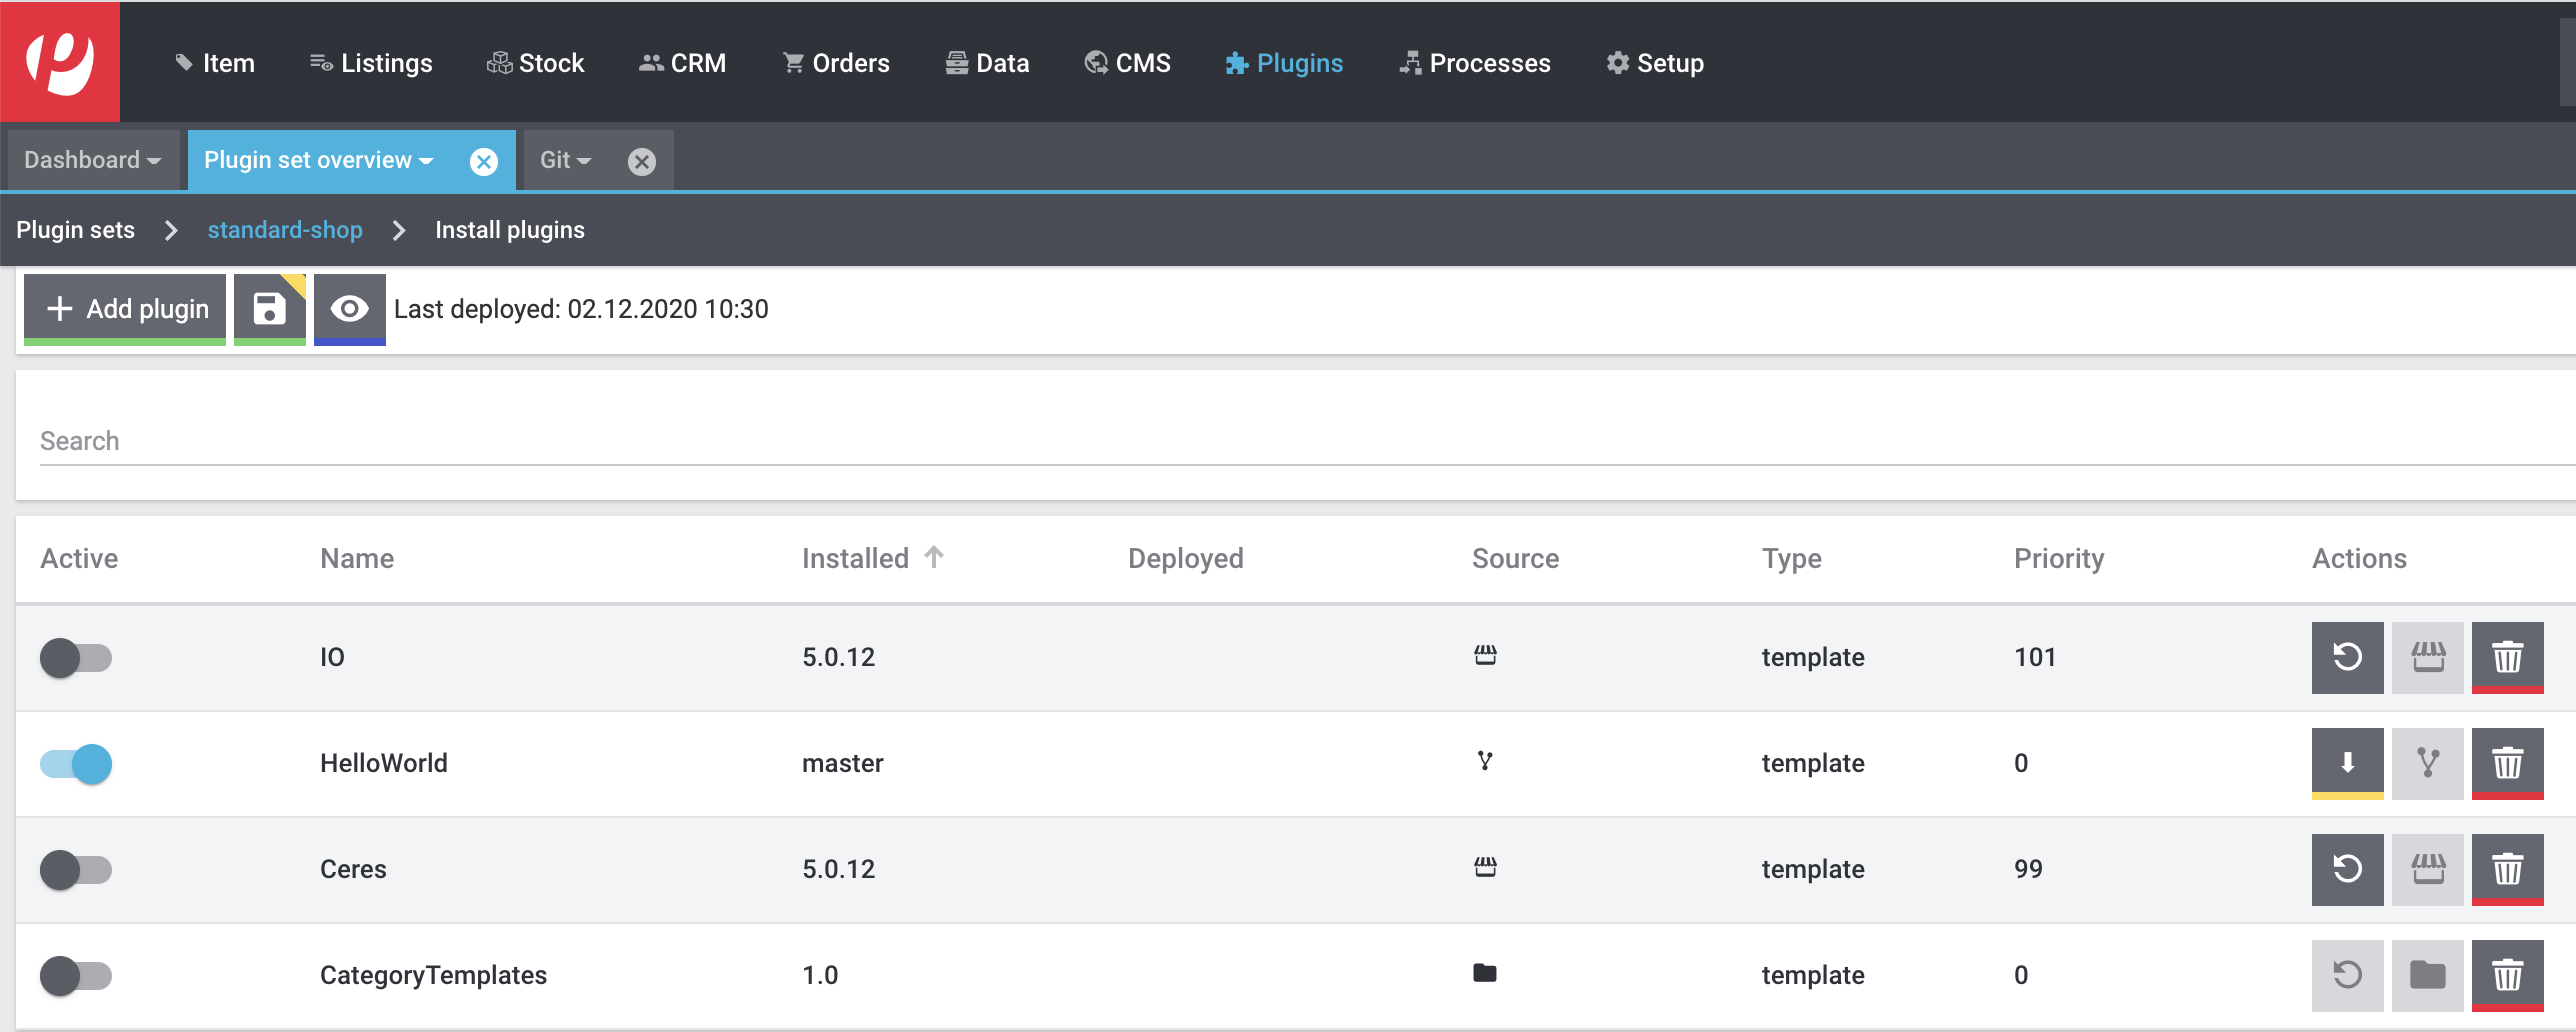
Open the PlentyONE back end. Click on Plugins→Plugin set overview and on your shop name.
-
Now click on
+ Add plugin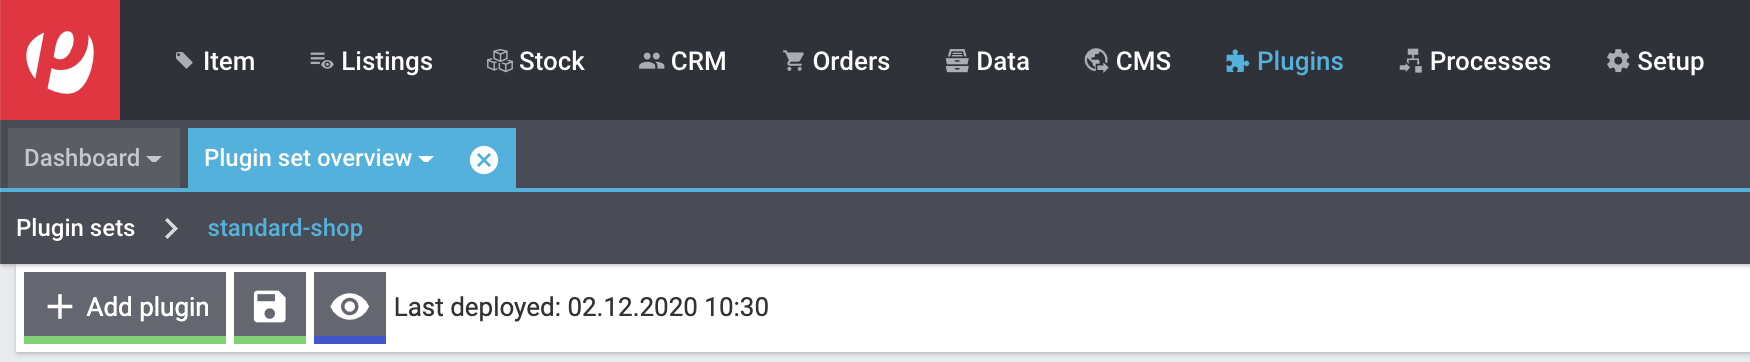
-
Now click on
Add Git repository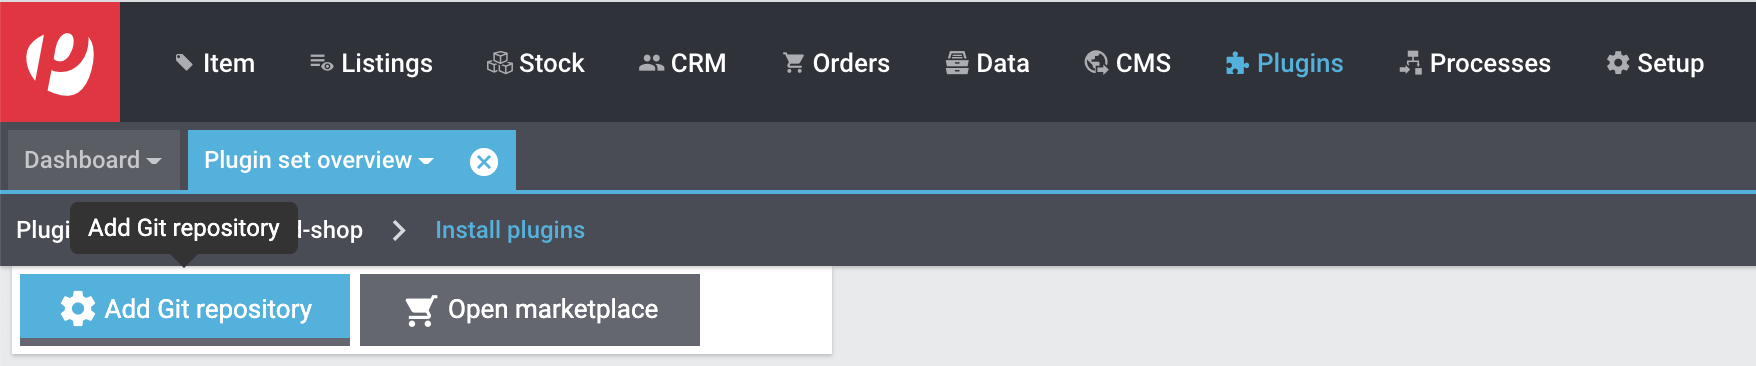
-
Click on the
+Button.
-
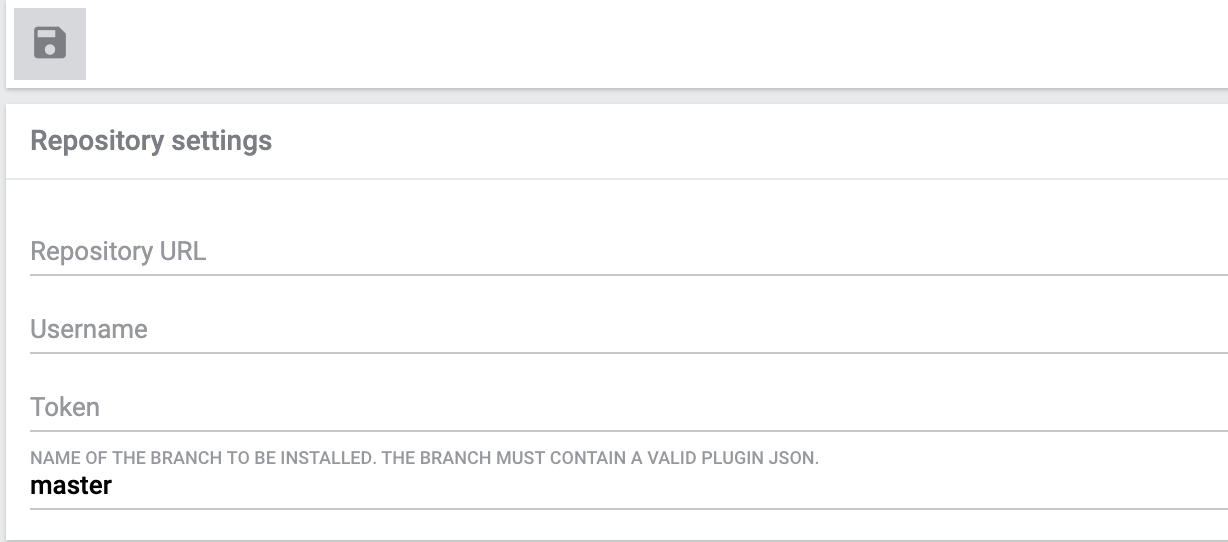
In this following field you can enter your Repository URL, your Username and your Github Token. When you are done, press the save icon.
-
You are almost done. In the Pluginset overview activate the toggle next to the HelloWorld Plugin (if it does not appear reload the current browser window). Click on the save icon, to deploy the current pluginset. When this is done click on the eye-icon to preview your current pluginset in the shop.
-
In the opened Shop, add the
/helloroute to the URL and…
Figure 2. What a result
Congratulations. Your first plugin has been deployed. If you have any questions, don’t hesitate to contact us through our Service Desk.